2. Windows 7 Compatibility Mode
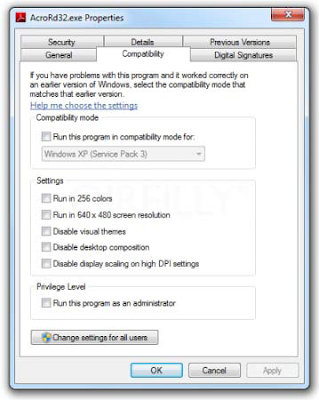
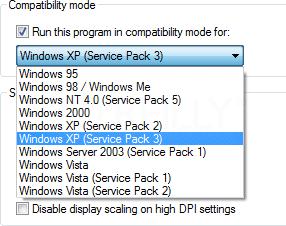
Not to be confused with XPM above, you can try this built in “fix” if you have trouble running applications designed for the previous versions of Windows. Using the CompatibilityMode, you can configure an application to tryto run in the version of Windows that it was written for. Check the option, and you will be able to select the versions of Windows to use to run the application.To configure an application to run in Compatibility Mode, right-click the application’s shortcut,.exe, or installation program, and select Properties. Next, select the Compatibility tab, and you should see the option “Run this program in compatibility mode for.” (See the exhibit below). Note that if Compatibility Mode is not supported for the application, the option will appear grayed out. The most likely reasons for this are that the application is designed for Windows 7 only, or that it is a 64-bit application.
3. Create and Mount VHD Files
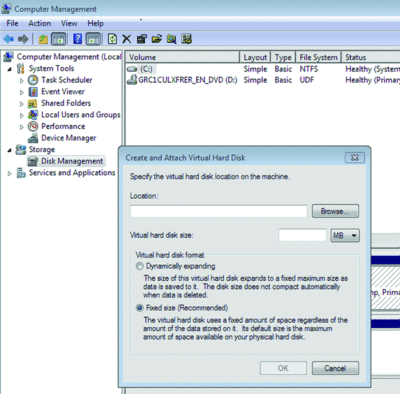
Microsoft’s Virtual PC creates its virtual machine hard drives in VHD files, and Windows 7 can now mount these directly so you can access them in the host system. Click Start, type diskmgmt.msc, and press Enter; then click Action, Attach VHD, and choose the file you’d like to mount. It will then appear as a virtual drive in Explorer and can be accessed, copied, or written just like any other drive. Click Action, Create VHD, and you can now create a new virtual drive of your own; right-click it, select Initialize Disk; and after it’s set up, right-click the unallocated space and select New Simple Volume. You will have a virtual drive that behaves just like any other, where you can drag and drop files, install programs, test partitioning software, or do whatever you like. But it’s actually just this VHD file on your real hard drive that you can easily back up or share with others. Right-click the disk and select Detach VHD to remove it. The command line DISKPART utility has also been upgraded with tools to detach a VHD file, and an EXPAND command to increase a virtual disk’s maximum size. Take a look at the new Windows 7 VHD options below.
4. Jump to the JumpLists
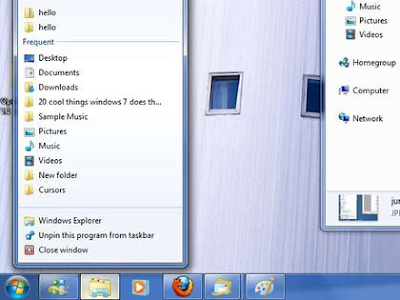
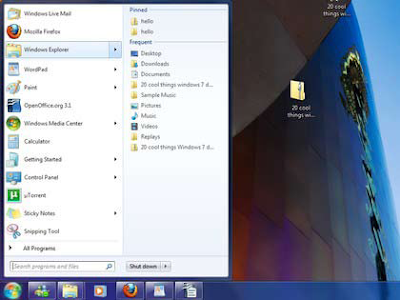
Jumplists are a feature of the re-designed taskbar that now becomes the quick-launch area throughout the entire bar. Just drag your shortcut or application icon onto it. Jumplists give you the option to view a list of recently accessed files by application, even when the application isn’t open, by right-clicking on the application’s icon in the taskbar. It also allows you to quickly access a favorite playlist without opening your media player. Jumplists can also be found integrated into the Start Menu. The following exhibits show you the Jumplist for the Explorer icon and the Jumplist for the StartMenu. I have Word pinned to my Taskbar, and from a right-click of the icon, I select the recent document from Jumplist and Word opens with my document. It save mouse clicks.
5. Preview Running Apps
Hover over an icon button on the re-designed task bar, and you will get a preview view of an open window that pops up to show you what’s inside. You can move your mouse on top of the preview window to look at a full-size “peek,” which is a maximized temporary view of your opened window. Click on the window to keep it maximized. While in Peek View, you can close the peek window with the exit button on the top right of the window. You can also use the Win + T hotkey to scroll through the preview in the taskbar.
6. AeroPeek the Desktop
In case you have not noticed the Show Desktop Button has been moved to the far right side of the TaskBar, on the right side of the notification area. Put your mouse on this new button, and it will preview the desktop. Hold down the Windows Key + SpaceBar, and you can AeroPeek the desktop; release the hotkeys, and the windows return to their position previous positions.
7. Snap and Shake into Place
Known as AeroSnap, simply drag your window to the left or right edge of the desktop to snap and resize the window to one half of the screen. Drag the window to the top to maximize it. A pretty neat idea made neater by the use of the keyboard shortcuts Win + respective left/right arrow keys). No longer do you have to frustratingly position the mouse at the edge of the window to resize it. Use the Aero Shake feature to minimize all background windows except your working window to the task bar, using your mouse. Grab the title bar of the window you wish to keep open and give it a shake. Have you ever had many, let’s say 10 or more, application and or tool windows open at the same time, and you wanted to minimize all of them except the window you were working on at the moment? Shake the window again and watch the background windows maximize. Wow!
8. Switch Multiple Display Devices
Try Win + P. Do this even if you don’t have an external monitor or projector attached at the moment. You will still be able to see the “film strip” style of duplicating or extending your display to other monitors, it takes just a second to select. The Win + P or run DisplaySwitch.exe presents you with an Alt + Tab style menu, which is ideal if you give a lot of presentations on your laptop or want to rearrange your extended desktop.
9. A Stage for Your Device
With the new Device and Printers button on the Start Menu, devices that are connected to your computer can have their own Stage. This Device Stage presents supported devices with a photo-realistic render and a link to the vendor’s website, along with other updates and useful information (such as firmware updates and manuals). Plug an external device into your machine and navigate to Device and Printers from the Start Menu. See what else your device tells you. Open an instance of the tool on your live machine and see what it will show. It will amaze you.
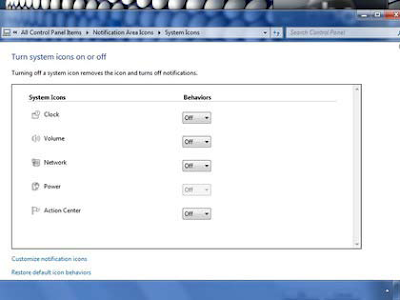
10. Eliminate the Notification Area

No comments:
Post a Comment