Friday, July 8, 2011

Disabling Vista’s User Account Control (UAC)

User Account Control (UAC) is a feature in Windows Vista that can help prevent unauthorized changes to your computer. UAC does this by asking you for permission or an administrator* password before performing actions that could potentially affect your computer's operation or that change settings that affect other users.

UAC will alert you with one of the following messages:

Windows needs your permission to continue

A Windows function or program that can affect other users of this computer needs your permission to start. Make sure to ensure that it's a function or program you want to run.

A program needs your permission to continue

This will happen when a program that's not part of Windows needs your permission to start. It has a valid digital signature indicating its name and its publisher, which helps to ensure that the program is what it claims to be. Make sure that this is a program that you intended to run.

An unidentified program wants access to your computer

This is caused by a program that your administrator has specifically blocked from running on your computer is trying to run. To run this program, you must have an administrator unblock it.

The main reason to use UAC is to prevent malware and spyware from installing or making changes to your computer without your permission. This comes in handy when you have users who may go to inappropriate websites or download software from the Internet that may be of risk to their computer. If you trust your users or if its just you that will be using your computer and you are confident that you will not be installing anything you shouldn’t then you can turn this feature off.

Here is how you turn the User Account Control feature off:

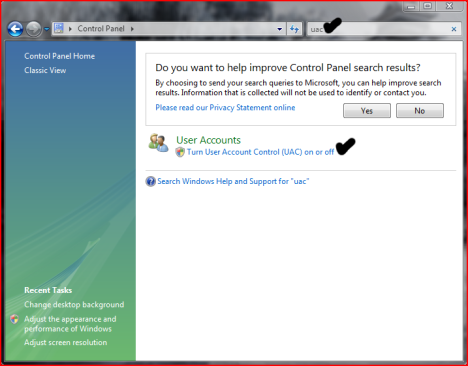
  • Open User Accounts from Control Panel.
  • Click on turn User Account Control on or off.
  • Uncheck the box that says Use User Account Control (UAC) to help protect your computer.
  • Click Ok. You may have to enter administrator credentials depending on who you are logged in as.
  • Restart your computer for the changes to take effect.

Best and fast way to Lock your computer

Lock My PC™ is an easy in use, powerful and compact tool to lock your computer from unauthorized use. When you leave your computer unattended, the program disables the hot keys (including Ctrl+Alt+Del), mouse, locks CD/DVD ROM doors and displays a lock screen. Nobody can access your system without providing the correct unlock password.

Unlike another similar computer lock software that cannot lock Ctrl+Alt+Del on a computer running Windows XP, our Lock My PC runs own keyboard driver to block such key combinations. Moreover, bulletproof startup lock guarantee that when your computer locaked at startup, this lock cannot be bypassed even in safe mode!

Why Lock My PC ?
You don't like snoopers. They are always prying into your e-mail messages, programs, data, files, etc. Lock My PC allows you to lock your computer with a password while you leave it unattended. You can lock your computer manually, with a menu or hotkey, or set up auto lock when your computer is idle.

Features and benefits:
  • Quick and safe computer lock by hot key, or mouse click
  • Autolock when computer is idle
  • Correct Ctrl+Alt+Del lock
  • Bulletproof startup lock (couldn't be bypassed in safe mode)
  • Different installation mode - setup for home or corporate use
  • CD/DVD-ROM doors lock
  • Multi-user support
  • Multimonitor support
  • Auto turnoff when computer is locked for a long time
  • Blind password option
  • Stealth mode
  • Windows XP x64 compatibility
  • Custom lock screens
  • Cycling lock screen images
  • Screen saving effects
  • Lock screen transparency - you can view movies under the locked screen
  • Password protected settings, quit and uninstall
  • Command line options
  • and many more ...

Difference from standard Windows XP computer lock feature
A lot of users believe that Lock My PC (as well as any other third party computer lock software) is useless because Windows XP has integrated computer lock feature. Well, indeed, you can simply press Win+L on Windows XP computer keyboard and your screen will be safely locked. What advantages Lock My PC has over Windows computer lock?

First of all, when your computer is locked by Windows Lock feature, anyone who has Windows Administrative privileges can unlock your computer. Such unlock will force to close your session (all unsaved changes will be lost). If Welcome screen option is enabled on your computer (the default settings for non-domain computer), Win+L doesn't lock the computer at all - it temporary switches the user off and displays the welcome screen - if you share your computer with others, they can logon with their usernames and use your computer. Moreover, if you share your account with other users (it's common for home PC), Windows XP lock feature is useless at all - your folks will unlock your computer without any problem.

Another benefits of Lock My PC in comare with Windows lock feature:
  • Custom lock screens and transparent lock screen options - your computer can be used as a presentation machine - the screen displays pictures or video, but nobody can touch your computer;
  • Secure Lock before Windows welcome/logon screen;
  • Displaying unsuccesfull unlock attempts - you will be notified if anyone tried to unlock your computer;
  • If Lock My PC is used in muilti-user mode, a supervisor can unlock the computer without closing user session;
  • You can lock CD/DVD ROM doors along with the desktop, keyboard and mouse - this can prevent CD media from being stolen while you are out;
  • Command line support allows you to use Lock My PC in Internet kiosks.

Safe and secure
Lock My PC provides reliable locking mechanism that impossible to bypass:
Keyboard driver installed with Lock My PC blocks different key combinations like Ctrl+Alt+Del, Alt+Tab, Ctrl+Esc and many others.
Booletproof startup lock ("Always lock at startup" option) displays password prompt box before Windows logon/welcome screen and (unlikle the most of desktop locking software) bannot be bypassed in Windows safe mode.

Easy to use
As soon as the installation completed, double click on the Lock My PC tray icon to lock the computer.
Right click on the tray icon to get access to the program settings. All settings are groupped by cathegoriies.

Autolock computer after certain time of inactivity
You can set up Lock My PC to lock your desktop automatically if the computer is idle during a certain period of time. Moreover you can set up Lock My PC to switch the computer off (Hibernate, Standby etc.) if your computer was locked during a certain period of time.

Stealth mode
Lock My PC can work in stealth mode. Stealth mode is a state when the program is running on your computer but does not show any sign of its presence in memory. To activate stealth mode, enable options "Do not show tray icon at startup" and "Hide Lock My PC from Task Manager".

Two installation modes
Lock My PC can be used both in single-user and multi-user environment. During the installation process, you will instruct Setup wehter to install Lock My PC in single-user mode or in multi-user mode.
In single-user mode, Setup will create Lock My PC shortcuts only for you. Locked computer can be unlocked only with your password. Some advanced options for corporate use will be blocked. This mode is ideal for home use.
In multi-user mode, Setup will create Lock My PC shortcuts for all user accounts. Each Lock My PC user will have their own password. The user who installed Lock My PC will be Lock My PC Administrator and his/her password - the administator's password. This mode is ideal for corporate use.

Custom Lock Screens
Lock My PC comes with a set of different lock screens. Lock screens are located in LockScreens subfolder of Lock My PC program folder.
You can create your own Lock Screen pictures and use them with Lock My PC. Your computer will look cool and unique when it is locked. You can use GIF, JPEG, BMP and animated GIF images as lock screens. Lock Screen transparency level option will allow you to vary the transparency from fully opaque to fully transparent. The latter allows you to lock keyboard and mouse only and may be helpful when you are watching videos or running presentations on your PC.

By the way, you can get this nice tool by downloading at Here.

Improve Your Computers Shutdown Speed

This tweak reduces the time Windows XP waits before automatically closing any running programs when you give it the command to shutdown.

 Go to Start then select Run
Type 'Regedit' and click OK
Find 'HKEY_CURRENT_USER\Control Panel\Desktop\'
Select 'WaitToKillAppTimeout'
Right click and select 'Modify'
Change the value to '1000'
Click 'OK'
Now select 'HungAppTimeout'
Right click and select 'Modify'
Change the value to '1000'
Click 'OK'
Now find 'HKEY_USERS\.DEFAULT\Control Panel\Desktop'
Select 'WaitToKillAppTimeout'
Right click and select 'Modify'
Change the value to '1000'
Click 'OK'
Now find 'HKEY_LOCAL_MACHINE\System\Cur rentControlSet\Control\'
Select 'WaitToKillServiceTimeout'
Right click and select 'Modify'
Change the value to '1000'
Click 'OK'


That's all and Enjoy your XP Shutdown Speed now!

How To Reinstall Windows Without Losing Anything

Over time, Windows loses stability. If you keep a computer for more than two years, at some point you're going to have to bite the bullet and reinstall Windows from scratch. But contrary to popular belief, you won't have to reformat your hard drive (with one exception, discussed below). The bad stuff you need to get rid of is all in your Windows folder.

Before you begin, gather your Windows and application CD-ROMs. Back up your data files (just to be safe), and then clear two days off your calendar. If everything goes smoothly, you can reinstall Windows in a few hours. But you have to assume something will go wrong: You may not be able to find a necessary CD, or data won't be where you thought it was, or something will simply refuse to work.

There's a difference between a repair reinstall and a complete reinstall. Though a repair (also called a refresh) will let you keep your current settings, a complete reinstall will give you a truly fresh version of Windows. Repairs are fast and easy, but they don't fix anywhere near as many problems. The instructions below are for total reinstalls, except where noted.

Your Vendor's Restore CD
Most computers ship with a vendor-specific restore CD rather than with a Microsoft Windows CD-ROM. (If your PC came with a Microsoft Windows CD, or if you bought a retail copy of Windows, skip to the section for your version.)

Some restore CDs give you all the options of a full Microsoft Windows CD, but with better instructions and the convenience of having all the right hardware drivers. Others can do nothing except reformat your hard drive and restore it to the condition it was in when you bought the PC. (This case is the exception I mentioned above that requires a reformat.)

If your restore CD is reformat-only, back up your data files to a network or a removable medium before reinstalling Windows. If you use Windows 98 or Me, back up C:\My Documents, plus the folders inside C:\Windows discussed in the 98 section below. If you have Windows 2000 or XP, back up C:\Documents and Settings. Also back up any other folders in which you store your data files.

Windows 98 and ME CDs
These Windows versions keep some important data inside your soon-to-be-erased Windows folder, so you need to copy several of its subfolders to another location. Right-click My Computer and select Explore. Double-click the C: drive icon (in Me, you may then have to click View the entire contents of this drive). Right-click in the right pane and select New, Folder. Name the new folder oldstuff.

Go to the Windows folder (you might have to click View the entire contents of this folder), hold down Ctrl, and select the following subfolders: All Users, Application Data, Desktop, Favorites, Local Settings, Profiles, SendTo, and Start Menu. If you don't see them all, select View, Folder Options (Tools, Folder Options in Me), click the View tab, select Show all files, and click OK. (If you still don't see them all, don't worry about it.) Press Ctrl and drag the folders to C:\oldstuff .

Restart Windows with a start-up disk in your floppy drive. (To make a start-up floppy, insert a disk, select Start, Settings, Control Panel, double-click Add/Remove Programs, click Startup Disk, Create Disk, and follow the prompts.) At the Startup Menu, select Start computer with CD-ROM support. While the drivers load, insert your Windows CD-ROM.

Unless you're doing a repair reinstall, type the command c:\windows\command\deltree /y c:\windows and press Enter. Deleting your old files could take time, but the /y switch suppresses confirmation prompts, so take a break.

When you're back at the A: prompt, type x:setup, where x is your CD drive letter (it's likely one letter past what it usually is in Windows, so if it's D: in Windows, it's probably E: here). Press Enter and follow the prompts.

Once you're back in Windows, reinstall your graphics card driver. If you have Windows set up for more than one user, you'll also have to re-create each account. Select Start, Settings, Control Panel, Users to do so. It's important that the user names match those in the old installation. If you're not sure, open Windows Explorer and navigate to C:\oldstuff\profiles. There you'll find a folder for each registered user name. Don't worry about passwords. Log off and log back on as each user. When you're done, log off and back on one more time, but instead of choosing a user name and a password, press Esc to enter Windows without being a specific user.

Select Start, Programs, MS-DOS Prompt (in Windows 98) or Start, Programs, Accessories, MS-DOS Prompt (in Windows Me). Type xcopy c:\oldstuff\*.* c:\windows /s /h /r /c and press Enter (if you want to know what the xcopy switches do, enter the command xcopy /?). When xcopy asks if it should overwrite a file, press a for All.

When xcopy is through, reboot and log on (as a particular user, if necessary). Open My Documents to make sure all your personal files are where they belong, including your Internet Explorer favorites and your custom Start menu shortcuts.

Now skip ahead to "Finishing the Job."

Windows 2000 and XP CDs
Boot your computer with your Windows CD-ROM inserted. When you get the 'Press any key to boot from CD' message, do so. (If you don't see that message before Windows starts, restart Windows, press the key you're prompted to enter for your PC Setup program, and change the boot order so your CD drive is first.)

At the 'Welcome to Setup' screen, press Enter. The R (repair) option takes you to the Recovery Module, which is useful if Windows won't boot, but it's no help with a reinstallation. Soon you'll be told that there's already a Windows installation on the computer. Press r for a repair reinstall or Esc to begin a complete, destructive one. For a complete restore, select your C: partition and press Enter. When you get the warning that says an operating system is on that partition, press c. When you are asked your partition preference, select Leave the current file system intact (no changes). When you're told that a Windows folder (or Winnt folder for Windows 2000) already exists, press l ('ell') to delete it and create a new one. Follow the series of prompts. When the installation program asks for your name, enter temp.

Once the installation is complete, your system will reboot into Windows, and you'll be logged on as user Temp. If the screen is difficult to read, reinstall your graphics card driver.

If you are reinstalling Windows XP, skip to "For Both Windows XP and 2000."

If you're reinstalling Windows 2000, log off as Temp and back on as Administrator. Now log off and on again, this time as Temp. Open Windows Explorer and navigate to C:\Documents and Settings. One of the subfolders will be named Administrator. Another will be named something like Administrator.computername.

Select Start, Programs, Accessories, Command Prompt. Type cd "\documents and settings" and press Enter. Then type xcopy administrator\*.* administrator.computername /s /h /r /c, replacing computername with the last part of that folder's name (after "Administrator.") in Documents and Settings. Now press Enter, and when you're asked about overwriting files or folders, press a for All.

If you have any users on the old installation besides Administrator, continue with the "For Both Windows XP and 2000" section. Otherwise, open Windows Explorer and make sure your data files are where they belong. Then go to Control Panel's Users and Passwords applet and delete the user Temp before skipping to "Finishing the Job."

For Both Windows XP and 2000
Reopen Windows Explorer. Select your C: drive (you may have to click Show the contents of this folder). Right-click in the right pane and select New, Folder. Name the new folder oldstuff. In the left pane, choose the Documents and Settings folder. It should have subfolders for each user from the previous install, plus one for Temp and a few others. Move the folders for your previous user names to oldstuff.

Select Start, Control Panel, User Accounts (Start, Settings, Control Panel, Users and Passwords in Windows 2000). Create an account for each user who was registered before the reinstall. Be sure to use the exact names. They are the same names as the folders you just moved to oldstuff. In Windows XP, at least one user must have administrator privileges.

Log off and back on as each user, before logging back on as Temp. Make sure that you select Log Off and not Switch User at Windows XP's Log Off dialog box (this isn't an issue in Windows2000).

Log on as Temp, select Start, Programs, Accessories, Command Prompt (in XP, Start, All Programs, Accessories, Command Prompt), type xcopy c:\oldstuff\*.* "c:\documents and settings" /s /h /r /c, and press Enter. Press a when asked if you want to overwrite a file. Log off Temp and log on to each restored account to make sure everyone's documents and data are where they belong. Log on as an administrator and run Control Panel's User Accounts applet again to remove the user Temp.

Finishing the Job
Now you've got Windows going, but not much else. You may have to reinstall your printer, sound card, and so on. Luckily, if a driver for the gadget came on your Windows or vendor restore CD, it was probably reinstalled automatically.

You'll have to reinstall your applications to reintroduce them to Windows. Some of their settings will not be changed by the re-installation, but those that were stored in the Registry were wiped out.

Once your Internet connection is running again, browse to Windows Update and download all critical updates for your version. Then visit the sites of your hardware vendors to update your drivers.

After the reinstall, some of your data may not show up where it should. Search for it in both your Application Data and oldstuff folders, and see if you can move it to the folder in which Windows or your apps are looking for it. If you find a folder called Identities with two subfolders whose names are long and indecipherable, try moving the contents of one to the other and see if your data reappears.

You've probably guessed that the final step is deleting the c:\oldstuff folder--and the Administrator folder in Windows 2000. Make this the very last step, however. Wait a couple of days, weeks, or even months until you're confident that all of your needed files are accessible.


Here is Another Possible Solution: easy way and tested:
  1. Start WindowsXP
  2. Go to the location of your Windows CD Setup source files
  3. Run WINNT32 /unattend
For example, D:\I386\winnt32 /unattend ( copy & paste this command into the RUN box, then press ENTER ) Your computer will do the rest.

Or,

Start > All Programs > Accessories > Command Prompt.
Copy & paste > D:\I386\winnt32 /unattend
Press Enter.

If you have i386 on your drive, you can replace D: ( if D: is your cd drive ) with the location of it.

I've often need to do this to repair something that had gotten corrupted and didn't want to do a clean install.

Notes:
D: is the driver letter where your windows XP Cd is
if D:\I386\winnt32 /unattend doesn't work then try : d:\winnt32 /unattend.

How To Enable Task Manager

Some Malware and Trojan often disable access to Windows Task Manager. Fortunately, a few quick Registry edits are usually all that are needed to regain control.

Here's how to do it:

  • Click Start
  • Click Run
  • Type REGEDIT
  • Click OK and The Registry Editor will now open
  • Browse to the following key: HKEY_CURRENT_USER\Software\Microsoft\Windows\CurrentVersion\Policies\system
  • In the right pane, look for the value: DisableTaskMgr
  • Right click DisableTaskMgr and select Delete. (When prompted with "Are you sure you want to delete this value", select Yes.
  • Now browse to the following key: HKEY_LOCAL_MACHINE\SOFTWARE\Microsoft\Windows\CurrentVersion\policies\system
  • In the right pane, look for the value: DisableTaskMgr
  • Right click DisableTaskMgr and select Delete. (When prompted with "Are you sure you want to delete this value", select Yes.
  • Close the Registry by choosing File | Exit
  • Restart your computer
You should now be able to access Task Manager. If not, reboot into Safe Mode and repeat the steps outlined above.

How To Block a Website

There are many reason why you need to know how to block a website. Some of the most common reasons are you have been targeted by spammers who use adware and popups to attack your PC. Other reasons may be to prevent your children from having access to certain site content such as porn and gambling.

Depending on the level of security you wish, learning how to block a website may require a adjustments of your web browser, the use of internet filtering software or editing of your host file. At any rate you can try all methods to see which works best for you.

Block a Website using Internet Explorer:
Internet Explorer version 5 and later offer the ability for heighten security and privacy. You can block a site by following the directions below:
  • Load your Internet explorer
  • Click Tools
  • Click Internet Options
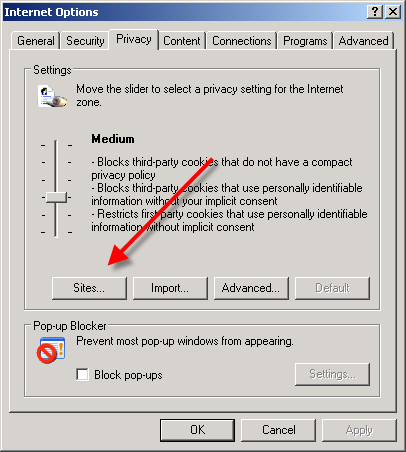
  • Click the Privacy tab
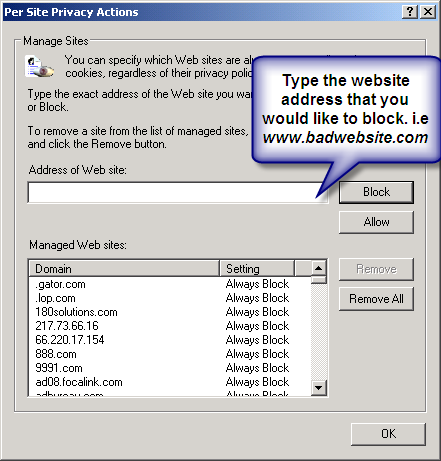
  • Under the Privacy window, Click Sites
  • Type in the site address that you want to Block and Click OK.
Remember this technique only blocks on one site at a time. Parental control software will allow you to block multiple sites and categories.

Other way to block a website using Internet Explorer:
Click Tools ->Internet Options->Security->Restricted sites->Sites->Type in the site address and Click ADD then click OK.

Block A Website in All Web Browsers:
This action will require you to edit your Host file. Your host file is a computer file used to store information on where to find a node on a computer network.

Here are the steps in Windows XP:
  • Click Start->All Programs->Accessories->Command Prompt2.
  • Click Command Prompt This will open a DOS command window.
  • Type: notepad C:/Windows/System32/drivers/etc/hosts
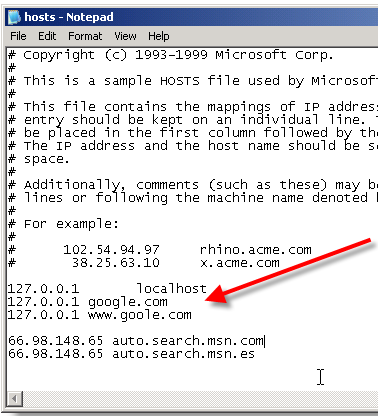
  • Locate the line 127.0.0.1 localhost
  • To block the website google.com for example, just add this text under 127.0.0.1 localhost:
127.0.0.1 google.com127.0.0.1 www.google.com
  • You can add as many sites any site, However you will need to prefix it with "127.0.0.1".
  • Save the file
Google will now be blocked in all web browser. This is an advanced but easy method on how to block a website.

Tweak Your Firefox for Super Fast Web Browsing

Fast loading web pages while surfing the Internet may have more to do with your web browser settings and preferences than your Internet connection speed.

Try these easy Firefox tweaks and you’ll see that you’re surfing the Internet from 3 to 30 times faster!

  • To get started, open your Firefox web browser. In the address/location bar type about:config and then press your Enter key.
  • In the Filter bar type network.http.pipelining. Then, double-click on this line under Preference Name in order to change the value from False to True.
  • In the Filter bar type network.http.pipelining.maxrequests. Then, double-click on this line under Preference Name and change the value from 4 to a higher number anywhere from 10 to 30. I set mine to 30.
  • In the Filter bar type network.http.proxy.pipelining. Then, double-click on this line under Preference Name in order to change the value from False to True.
  • In the Filter bar type network.dns.disableIPv6. Then, double-click on this line under Preference Name in order to change the value from False to True.
  • In the Filter bar type plugin.expose_full_path. Then, double-click on this line under Preference Name in order to change the value from False to True.
  • In the Filter bar type network.protocol-handler.external.ms-help. Now, you are going to create a new Preference Name with an Integer Value. To do this, right-click on this line under Preference Name and select New, then Integer. In the New Integer value box type in nglayout.initialpaint.delay and click OK. Then in the Enter Integer value box type 0 (that’s a zero) and click OK.
  • In the Filter bar again type network.protocol-handler.external.ms-help. Now, you are going to create another new Preference Name with an Integer Value. To do this, right-click on this line under Preference Name and select New, then Integer. In the New Integer value box type in content.notify.backoffcount and click OK. Then in the Enter Integer value box type 5 and click OK.
  • In the Filter bar again type network.protocol-handler.external.ms-help. Now, you are going to create another new Preference Name with an Integer Value. To do this, right-click on this line under Preference Name and select New, then Integer. In the New Integer value box type in ui.submenuDelay and click OK. Then in the Enter Integer value box type 0 (that’s a zero) and click OK.
Now, close your web browser and restart it. You’ll see how much faster web pages are loading. I sure did.

Windows XP SP3 TCP/IP Patcher

This patch is designed only for all versions of WIndows XP SP3. By increasing the number of TCP/IP connections allowed at one time, your internet speeds up, especially when you are downloading stuff or playing online games.

I recommend you to set the limitation to 500 to 600. Before applying the patcher, remember to unplug internet connections and restart computer to make sure the TCP/IP file is not in use.
Download this patcher at Here.

How To Make A Bootable Windows USB Flash Disk

1. Does your computer support booting from USB?

Usually, if its an option in your BIOS boot sequence menu, the answer to this is yes. If its not there, look for BIOS updates. If you are not sure, proceed and see what happens

2. Sorting out the "Bootability" of your USB-Drive

Connect your USB drive to your computer, directly, without a Hub. Then, shut down your computer, disconnect any other hard disk drives from it, and insert your original Windows XP CD into the drive. Start the installation, and proceed to the section where you are allowed to pick a hard drive. If it goes beyond the partition selection, your drive is already fine for booting Windows XP. If not (seems to be the cases with many of the Freecom USB HDDs for example), you will get an error like "Windows is unable to find your drive, partition, data etc bla". This is usually not a big problem.


All you need to do is "properly" format the drive. Reboot into your normal Windows, and get this HP tool , and use it to format your HDD completely. I chose NTFS format, worked fine everytime i tried. After this, my drives are recognized as valid installation devices by the Windows XP installer.
(In fact, i did not manage to create a USB primary partition with FAT32 that was recognized as being installable)


3. Dumping the original Windows CD into an ISO File

Pretty easy one. Simply open WinISO, and select Actions -> Make ISO from CDROM, and save your CD image.

4. Extracting the files we need to work on

After the CD dump is done, close and reopen WinISO. Then, open the ISO file you just created using File -> Open.
Now, click the I386 folder, and select the following files (Ctrl key to multi-select)

TXTSETUP.SIF
DOSNET.INF
USB.IN_
USBPORT.IN_
USBSTOR.IN_

Select Actions -> Extract and put the resulting files into some folder to work on them.

5. Unpacking IN_ files

Use the Cab SDK (from the command line) for extracting the contents of the .IN_ files. Each of them contains exactly one .inf file. If you are unsure how to use the Cab SDK, here is an example command line:

cabarc x USBSTOR.IN_

You should end up with three new files in the folder, called:

usb.inf
usbport.inf
usbstor.inf

You can now delete the .IN_ files.

6. Editing the files

This is the main job. i ll also try to explain a bit whats happening. Use a simple Texteditor like Notepad.

TXTSETUP.SIF

This file is loaded on the initial install step by the Windows XP CD installer. In this file, we will change the way Windows treats USB devices during system setup -- the default is to only treat them as input devices during installation -- we will change this to include mass storage driver support (which needs to be loaded into the installer much earlier in order to work).

First, move the following entries from [InputDevicesSupport.Load] to the [BootBusExtenders.Load] section , as shown here


[BootBusExtenders.Load]
pci = pci.sys
acpi = acpi.sys
isapnp = isapnp.sys
acpiec = acpiec.sys
ohci1394 = ohci1394.sys
usbehci = usbehci.sys
usbohci = usbohci.sys
usbuhci = usbuhci.sys
usbhub = usbhub.sys
usbstor = usbstor.sys

[InputDevicesSupport.Load]
usbehci = usbehci.sys
usbohci = usbohci.sys
usbuhci = usbuhci.sys
usbhub = usbhub.sys
usbccgp = usbccgp.sys
hidusb = hidusb.sys
serial = serial.sys
serenum = serenum.sys
usbstor = usbstor.sys

... now the same for [BootBusExtenders] and [InputDevicesSupport]


[BootBusExtenders]
pci = "PCI-Bustreiber",files.pci,pci
acpi = "ACPI Plug & Play-Bustreiber",files.acpi,acpi
isapnp = "ISA Plug & Play-Bustreiber",files.isapnp,isapnp
acpiec = "Integrierter ACPI-Controllertreiber",files.none,acpiec
ohci1394 = "IEEE-1394-Bus-OHCI-konformer Anschlusstreiber",files.ohci1394,ohci1394
usbehci = "Erweiterter Hostcontroller",files.usbehci,usbehci
usbohci = "Open Hostcontroller",files.usbohci,usbohci
usbuhci = "Universeller Hostcontroller",files.usbuhci,usbuhci
usbhub = "Standard-USB-Hubtreiber",files.usbhub,usbhub
usbstor = "USB-Speicherklassentreiber",files.usbstor,usbstor

[InputDevicesSupport]
usbehci = "Erweiterter Hostcontroller",files.usbehci,usbehci
usbohci = "Open Hostcontroller",files.usbohci,usbohci
usbuhci = "Universeller Hostcontroller",files.usbuhci,usbuhci
usbhub = "Standard-USB-Hubtreiber",files.usbhub,usbhub
hidusb = "HID-Parser",files.hidusb,hidusb
serial = "Treiber fur seriellen Anschluss",files.none,serial
serenum = "Enumerator fur seriellen Anschluss",files.none,serenum
usbstor = "USB-Speicherklassentreiber",files.usbstor,usbstor
usbccgp = "USB Generic Parent Driver",files.usbccgp,usbccgp


Next, we also have to write several keys into the registry. Convieniently, the txtsetup.sif allows you to specify files that are parsed and instered into the registry at install time. Insert the following in the [HiveInfs.Fresh] section:

[HiveInfs.Fresh]
AddReg = hivedef.inf,AddReg
AddReg = hivesys.inf,AddReg
AddReg = hivesft.inf,AddReg
AddReg = hivecls.inf,AddReg
AddReg = hiveusd.inf,AddReg
AddReg = dmreg.inf,DM.AddReg
AddReg = usbboot.inf,usbservices

and also in [SourceDisksFiles]


[SourceDisksFiles]
usbboot.inf = 1,,,,,,_x,3,,3
bootvid.dll = 1,,,,,,3_,2,0,0,,1,2
kdcom.dll = 1,,,,,,3_,2,0,0,,1,2


Finally, save and close TXTSETUP.SIF. We are done with it.

DOSNET.INF

Now, open DOSNET.INF , and change the second [Files] section to look like this:


[Files]
d1,usbboot.inf
d1,_default.pif
d1,12520437.cpx
d1,12520850.cpx

usb.inf

Change the bolded lines in the [StandardHub.AddService] and [CommonClassParent.AddService] sections:


[StandardHub.AddService]
DisplayName = %StandardHub.SvcDesc%
ServiceType = 1 ; SERVICE_KERNEL_DRIVER
StartType = 0 ; SERVICE_DEMAND_START
ErrorControl = 1 ; SERVICE_ERROR_NORMAL
ServiceBinary = %12%\usbhub.sys
LoadOrderGroup = Boot Bus Extender

[CommonClassParent.AddService]
DisplayName = %GenericParent.SvcDesc%
ServiceType = 1 ; SERVICE_KERNEL_DRIVER
StartType = 0 ; SERVICE_DEMAND_START
ErrorControl = 1 ; SERVICE_ERROR_NORMAL
ServiceBinary = %12%\usbccgp.sys
LoadOrderGroup = Boot Bus Extender


usbport.inf

Change the bolded lines in the [EHCI.AddService], [OHCI.AddService] , [UHCI.AddService] and [ROOTHUB.AddService] sections:


[EHCI.AddService]
DisplayName = %EHCIMP.SvcDesc%
ServiceType = 1 ; SERVICE_KERNEL_DRIVER
StartType = 0 ; SERVICE_DEMAND_START
ErrorControl = 1 ; SERVICE_ERROR_NORMAL
ServiceBinary = %12%\usbehci.sys
LoadOrderGroup = Boot Bus Extender

[OHCI.AddService]
DisplayName = %OHCIMP.SvcDesc%
ServiceType = 1 ; SERVICE_KERNEL_DRIVER
StartType = 0 ; SERVICE_DEMAND_START
ErrorControl = 1 ; SERVICE_ERROR_NORMAL
ServiceBinary = %12%\usbohci.sys
LoadOrderGroup = Boot Bus Extender

[UHCI.AddService]
DisplayName = %UHCIMP.SvcDesc%
ServiceType = 1 ; SERVICE_KERNEL_DRIVER
StartType = 0 ; SERVICE_DEMAND_START
ErrorControl = 1 ; SERVICE_ERROR_NORMAL
ServiceBinary = %12%\usbuhci.sys
LoadOrderGroup = Boot Bus Extender

[ROOTHUB.AddService]
DisplayName = %ROOTHUB.SvcDesc%
ServiceType = 1 ; SERVICE_KERNEL_DRIVER
StartType = 0 ; SERVICE_DEMAND_START
ErrorControl = 1 ; SERVICE_ERROR_NORMAL
ServiceBinary = %12%\usbhub.sys
LoadOrderGroup = Boot Bus Extender

usbstor.inf

Change / Add [USBSTOR.AddService] section to this:


[USBSTOR.AddService]
DisplayName = %USBSTOR.SvcDesc%
ServiceType = 1
StartType = 0
Tag = 3
ErrorControl = 1
ServiceBinary = %12%\USBSTOR.SYS
LoadOrderGroup = Boot Bus Extender

new file: USBBOOT.INF

Create a new file called USBBOOT.INF in the same directory as your other changed files, and put the following content into it:


[usbservices]

HKLM,"SYSTEM\CurrentControlSet\Services\USBSTOR","DisplayName",0x00000000,"USB Mass Storage Driver"
HKLM,"SYSTEM\CurrentControlSet\Services\USBSTOR","ErrorControl",0x00010001,1
HKLM,"SYSTEM\CurrentControlSet\Services\USBSTOR","Group",0x00000000,"System Reserved"
HKLM,"SYSTEM\CurrentControlSet\Services\USBSTOR","ImagePath",0x00020000,"system32\DRIVERS\USBSTOR.SYS"
HKLM,"SYSTEM\CurrentControlSet\Services\USBSTOR","Start",0x00010001,0
HKLM,"SYSTEM\CurrentControlSet\Services\USBSTOR","Type",0x00010001,1

HKLM,"SYSTEM\CurrentControlSet\Services\usbehci","DisplayName",0x00000000,"USB 2.0 Enhanced Host Controller Miniport Driver"
HKLM,"SYSTEM\CurrentControlSet\Services\usbehci","ErrorControl",0x00010001,1
HKLM,"SYSTEM\CurrentControlSet\Services\usbehci","Group",0x00000000,"System Reserved"
HKLM,"SYSTEM\CurrentControlSet\Services\usbehci","ImagePath",0x00020000,"system32\DRIVERS\usbehci.sys"
HKLM,"SYSTEM\CurrentControlSet\Services\usbehci","Start",0x00010001,0
HKLM,"SYSTEM\CurrentControlSet\Services\usbehci","Type",0x00010001,1

HKLM,"SYSTEM\CurrentControlSet\Services\usbhub","DisplayName",0x00000000,"USB2 Enabled Hub"
HKLM,"SYSTEM\CurrentControlSet\Services\usbhub","ErrorControl",0x00010001,1
HKLM,"SYSTEM\CurrentControlSet\Services\usbhub","Group",0x00000000,"System Reserved"
HKLM,"SYSTEM\CurrentControlSet\Services\usbhub","ImagePath",0x00020000,"system32\DRIVERS\usbhub.sys"
HKLM,"SYSTEM\CurrentControlSet\Services\usbhub","Start",0x00010001,0
HKLM,"SYSTEM\CurrentControlSet\Services\usbhub","Type",0x00010001,1

HKLM,"SYSTEM\CurrentControlSet\Services\usbuhci","DisplayName",0x00000000,"Microsoft USB Universal Host Controller Miniport Driver"
HKLM,"SYSTEM\CurrentControlSet\Services\usbuhci","ErrorControl",0x00010001,1
HKLM,"SYSTEM\CurrentControlSet\Services\usbuhci","Group",0x00000000,"System Reserved"
HKLM,"SYSTEM\CurrentControlSet\Services\usbuhci","ImagePath",0x00020000,"system32\DRIVERS\usbuhci.sys"
HKLM,"SYSTEM\CurrentControlSet\Services\usbuhci","Start",0x00010001,0
HKLM,"SYSTEM\CurrentControlSet\Services\usbuhci","Type",0x00010001,1

HKLM,"SYSTEM\CurrentControlSet\Services\usbohci","DisplayName",0x00000000,"Microsoft USB Open Host Controller Miniport Driver"
HKLM,"SYSTEM\CurrentControlSet\Services\usbohci","ErrorControl",0x00010001,1
HKLM,"SYSTEM\CurrentControlSet\Services\usbohci","Group",0x00000000,"System Reserved"
HKLM,"SYSTEM\CurrentControlSet\Services\usbohci","ImagePath",0x00020000,"system32\DRIVERS\usbohci.sys"
HKLM,"SYSTEM\CurrentControlSet\Services\usbohci","Start",0x00010001,0
HKLM,"SYSTEM\CurrentControlSet\Services\usbohci","Type",0x00010001,1


7. Repack the inf files into their original IN_ format

If you have not already deleted your extracted .IN_ files, do so now. They need to be replaced. Open a DOS shell again, and navigate to the folder with your changed files. Then exceute the following commands:


cabarc n USB.IN_ usb.inf
cabarc n USBPORT.IN_ usbport.inf
cabarc n USBSTOR.IN_ usbstor.inf

The three IN_ files should now exist again.

Congratulations. All out modifications are done.

8. Inject the changed files into the ISO

Open your Windows CD image again with WinISO. Navigate to the I386 folder, and delete the following files from the ISO, saving the changes to the ISO afterwards:

DOSNET.INF
TXTSETUP.SIF
USB.IN_
USBPORT.IN_
USBSTOR.IN_

Just to be sure all is updated in the ISO, cloase and repoen the ISO in WinISO. Now, again go to the I386 folder and select "Add Files". Now add your changed files, in detail:

USBBOOT.INF
DOSNET.INF
TXTSETUP.SIF
USB.IN_
USBPORT.IN_
USBSTOR.IN_

Save the ISO. You are done.

9. Burn the ISO back to CD

Feel free to use any burning package you want. I used the free and simple Burnatonce

10. Install Windows XP from the CD

Shut down your computer. Disconnect ANY internal and external hard drives (so Windows cannot find them during installation and mess up their Master Boot Records hehe). Some computers will have trouble to boot without an internal HDD attached, check in your BIOS and, if possible, remove the HDD from the boot sequence and set the USB Harddisk as the first boot device, and the CDROM as second.

Also, now connect your USB Harddrive directly to the computer, without any Hubs in between.

Windows should install just fine, with the exceptions noted below.

Issues you will encounter during installation:

During driver installation, the USB drivers will prompt you, as they are "not certified" - This is normal. Our changes invalidated the checksum, and therefore the driver is no longer signed. Just press "yes" a couple of times.
Upon completion of the install, the system will complain once on the first bootup that the pagefile does not exist. You can ignore this for now, as Windows will work fine without it. People are looking at fixing this issue, but its not critical for now.

Once everything is up and running , shut down and reconnect all your drives.

Thursday, July 7, 2011

How to hack a computer

Hacking can be difficult and there are many different ways to hack and many different exploits to use. Hacking is neither defined nor limited by exploitation or exploration. Hacking into someone else's system may be illegal, so don't do it unless you are sure you have permission from the owner of the system you are trying to hack or you are sure it's worth it AND you won't get caught.

Hacking was primarily used for learning new things about systems and computing in general, 'in the good ol' days'. In recent years it has taken dark connotations and in general has been looked down upon. Likewise, many corporations now employ "hackers" to test the strengths and weaknesses of their own systems. These hackers know when to stop, and it is the positive trust they have built that earn them large salaries.

There is a major difference between a hacker and a cracker. A cracker is motivated by malicious (namely: money) reasons; a hacker is attempting to gain knowledge through exploration, at any cost and in any way - not always legal.

1.Learn a programming language. You shouldn't limit yourself to any particular language. C is the language the systems are built in, it teaches you what's very important in hacking: how the memory really works. Python or Ruby are modern, powerful scripting languages, that can be used to automatize various tasks; Perl is a good choice in this field as well. PHP is worth learning only because it's what newbies use to "hack" poorly written web-applications (forums, blogs etc). Bash scripting is a must, that's how you can easily manipulate most servers - writing one-line scripts, which will do most of the job. Finally, you can't do much without knowledge of ASM - you *can't* exploit a program if you don't know that.
  1. Use a *nix terminal for commands. Cygwin will help emulate this for Windows users. DOS is worthless in this area. The tools in this article can be found for Windows based machines. Nmap particularly, uses WinPCap to run on Windows and does not require Cygwin. However, Nmap works poorly on Windows systems due to the lack of raw sockets. You should also consider using Linux or BSD, which are both more flexible, more reliable, and more secure. Most Linux distributions come with many useful tools pre-installed.
  2. Try securing your machine first. Make sure you fully understood all common techniques, including the way to protect yourself. Start with basics - found a server which has site about racism, homophobia or other bad activities? Try to hack it, any way you can. Yet again, don't change the site, just make it yours.
  3. Know your target. The process of gathering information about your target is known as 'enumeration'. Can you reach the remote system? You can use the ping utility (which is included in most operating systems) to see if the target is 'alive', however, you can not always trust the results of the ping utility, as it relies on the ICMP protocol, which can be easily shut off by paranoid system administrators.
  4. Determine the operating system (OS). This is important because how can you gain access to a system if you don't know what the system is? This step involves running a scan of the ports. Try pOf, or nmap to run a port scan. This will show you the ports that are open on the machine, the OS, and can even tell you what type of firewall or router they are using so you can plan a course of action. You can activate OS detection in nmap by using the -O switch.
  5. Find some path or open port in the system. Common ports such as FTP (21) and HTTP (80) are often well protected, and possibly only vulnerable to exploits yet to be discovered. Try other TCP and UDP ports that may have been forgotten, such as Telnet and various UDP ports left open for LAN gaming. An open port 22 is usually evidence of an SSH (secure shell) service running on the target, which can sometimes be bruteforced.
  6. Crack the password or authentication process. There are several methods for cracking a password, including brute force. Using brute force on a password is an effort to try every possible password contained within a pre-defined dictionary of brute force software. Users are often discouraged from using weak passwords, so brute force may take a lot of time. These days there are major improvenments in brute-force techniques. Most hashing algorithms are found weak, and you can significally improve the cracking speed by exploiting these weaknesses (like you can cut the MD5 algorithm in 1/4, which will give huge speed boost). Also new techniques use graphic card like the processor - and it's thousands times faster. You may try using Rainbow Tables for fastest password cracking. Notice that password cracking is good technique only if you already got the hash of password. Trying every possible password while logging to remote machine is not a good idea, as it's easily detected by intrusion detection systems, pollute system logs and may take years to complete. It's often much easier to find other way into system, than cracking password.
  7. Get super user (root) privileges. Try to get root privileges if targeting a *nix machine, or administrator privileges if taking Windows systems. Most information that will be of vital interest is protected and you need a certain level of authentication to get it. To see all the files on a computer you need super user privileges. This is a user account that is given the same privileges as the "root" user in Linux and BSD operating systems. For routers this is the "admin" account by default (unless it has been changed), for Windows, this is the Administrator account, etc. Just because you have gained access to a connection doesn't mean you can access everything. Only a super user, the administrator account, or the root account can do this.
  8. Use various tricks. Often to gain super user status you have use tactics such as creating a "buffer overflow", which is basically causing the memory to dump and allowing you to inject a code or perform a task at a higher level then you're normally authorized. In unix-like systems this will happen if the bugged software has setuid bit set, so program will be executed as different user (superuser for example). Only writing or finding an insecure program that you can execute on their machine will allow you to do this.
  9. Create a backdoor. Once you have gained full control over a machine, it's best to make sure you can come back again. This can be done by 'backdooring' an important system service, such as the SSH server. However your backdoor may be removed upon the next system upgrade - really experienced hackers would backdoor the compiler itself, so every compiled software would be a potential way to come back.
  10. Cover your tracks. Never ever let the administrator know that the system is compromised. Do not change the website (if any), do not create more files than you really need. Do not create any additional users. Act as fast as possible. If you patched a server like SSHD, make sure it has your secret password hard-coded. If someone tries to login with this password, the server should let them in, but shouldn't contain any crucial information.

Tips

  • Read books discussing TCP/IP networking.
  • Hackers are those that built the internet, made Linux, and work on open source software. It is advisable to look into hacking, as it is respected and requires a lot of professional knowledge to do anything serious in real environments.
  • Although it's great there are many legal, safe training grounds available for anyone, there is a sad truth that you won't become any near "medicore" if you won't start doing illegal actions. You can't become anyone if you won't find real problems on real systems, with the real risk of getting caught. Keep that in mind.
  • Remember, hacking is not about breaking into computers, getting well paid job, selling exploits on black market nor (especially) helping anyone to secure machines. You're *not* here to help admin do his job. You're here to become *best*. Keep in mind, if your target is not "being best", you won't ever become good. Of course, don't get cocky, don't think about yourself as the best of the best. Just make this your final target, you must become better and better. Every day you didn't learn something new, is a wasted day. You and only you counts - become best, at any cost. There are no half-ways, you must give full yourself.
  • Using these tactics on a popular corporate or government computer is asking for trouble unless you're a professional hacker. Keep in mind there are people a bit more knowledgeable than you who are protecting these systems for a living. Once found, they sometimes monitor intruders to let them incriminate themselves first before legal action is taken. This means you might think you have free access after hacking into a system, when in fact, you're being watched, and may be stopped at any moment.
  • Find information online related to hacking, or to even attend an "underground" hacking event, visit these sites:

    • enigmagroup.org A legal and safe network security resource where users test their hacking skills on various challenges and learn about hacking and network security. Also provided are articles, comprehensive and active forums, and guides and tutorials.
    • insecure.org Hacking tools and other software.
    • [1] Learn to hack, keep yourself safe, and many other useful computer skills.
    • securityforest.com Tools, papers, exploits, and other reference material.


Warnings

  • Misuse of this information may be a local and/or federal crime. This article is intended to be informational and should only be used for ethical purposes.
    • Don't think for one second that just because you followed the steps means you will be a hacker. It takes years of study to be good.
  • Do not delete entire logfiles, instead, just remove the incriminating entries from the file. What do you think would look more suspicious; logs with a few entries missing, or the entire log file destroyed? But other question is, if there is a backup logfile? What if they just look for differences and find the exact things you erased? Always think about your actions. Best thing is to delete random lines of log, including your.
  • Be extremely careful if you think you have found a very easy crack or a crude mistake in security management. A security professional that protects that system may be trying to track you or may be setting up a honeypot.
  • If you aren't confident with your skills, stay away from breaking into government and military networks. Even if they have weak security, they have strong money to trace and bust you. If you do find a hole in such network, it's best to hand it to more experienced hacker who you trust, who can put these systems into good use.
  • Although you may heard the opposite, don't help anyone to patch their programs or systems. This is considered extremely lame and leads to being banned from most real hacking communities. And if you would release private exploit someone found, he can become your enemy - and he's probably better than you are.
  • Never do anything "for fun". Remember it's not a toy to hack into network, but it's a power to change the world. Don't waste that on childish actions. Again, don't change anything in the system to mark it as "owned" or anything that silly.


Things You'll Need

  • A computer with a connection to the Internet.
  • A proxy (Optional; The Onion Router is best choice here)
  • An IP scanner
  • Petraflops help
  • Brute-force program. For MD5 hashes the best one is BarsWF

How to earn money online

53 Ways To Make Money Online!


Ways to make money online, search for it and you’ll find hundreds of them. Some are legitimate and real methods for making money online and others are scams and get rich quick schemes. In this post, you will find information about 53 legitimate ways to make money working from home, from making money with affiliate programs, blogging and freelancing to making money with ebay, earning money with online surveys and GPT programs to other simple ways to make money fast.


Although there are so many different ways to make money on the internet, making money online isn’t always easy or quick. It takes hard work and dedication. Yes, there are some online jobs that are easier than others and there are some quick(er) ways to make money, but if you want to make real money, you have to put some time and effort into it.

Earning money online is no different than making money offline. If you want to work at home, you need to have the right mind set. Forget about making money with a push of a button, free money or the magic money making method that is going to get you rich over night. Though internet itself is a virtual world, there is nothing virtual about the need to work to make money online.

Earning money online takes hard work and consistency. But, if you are willing to put enough time and effort into it, there are number of ways you can use the internet to make extra money. Here are 53 ways to make money online:

Note:
Wherever possible, I tried to provide other resources and information about some of these methods by linking to other more in dept and detailed articles, which will give you more information on how to make money online with that specific method. I hope it will be helpful.

Ways to Make Money Online- Affiliate Marketing

Making Money with Affiliate Programs
This is by far the best way to make money online, at least in my opinion. You are basically selling other people’s stuff for a commission. You can find digital products like e-books and short reports to promote on sites like ClickBank and PayDotcom.  Affiliate Marketing for beginners

Get Paid to Surf
Get paid to surf is kind of big on the internet. And of course scammers are all over it as well. So, be careful and make sure you register with known and trusted sites. You won’t make much money, but not much work is required either. Get paid to surf

Make Money Selling Photos Online
If you like photography and can take interesting pictures, there are many sites you can upload your images too and get paid every time someone downloads an image of yours. The good thing is that one photo can sell over and over again. Imagine the potential of having 100s of images on few sites. Make money selling photos

Get Paid Sharing Files Online
There are a couple of document sharing sites that you can upload any kind of file you own to, and every time someone downloads it, you get paid for it. The files can be in almost any format, from txt to pdf and everything else. Get paid to upload files

Earn Money as a Mystery Shopper
Mystery shopping is becoming a popular method for companies to evaluate there employees and their customer services skills. Although there are a lot of different opinions about this, mystery shopping is actually growing as an industry. You will be assigned to shop and dine in different places and report your experience back. Depending on specific assignments, you can expect to get paid anywhere from $40 to $300 or more per assignment. Of course, the amount that you spend buying goods and services will be reimbursed. Sometimes you get to keep the item you bought at no charge to you.  Legitimate mystery shopping companies

Sell Unused Items on eBay and Craigslist
Almost everyone knows how to make money on ebay these days and you are probably tired of hearing about it. But the truth of the matter is that ebay is a really good way to make money. Another great place to sell unused stuff is CraigsList. CL is one of the most visited sites in the world, so your ad will get viewed by many potential buyers and its free to place an ad on CL. Look around your house and find things you don’t need and use any more. List them on ebay for a fair price. No mater how much money you end up making selling your unwanted stuff on ebay, its still better than letting them dust in your garage!

Make Money Designing Logos
Hundreds of new websites and blogs are born everyday. Most of them will need a logo, but not every site owner knows how to make a logo. If you have some design talent, you can make good money offering custom logo creations on webmaster related forums and classified ads sites. Don’t have a professional software? Use free imaging tools such as PhotoFilter to make stunning logos.

Make Money Flipping Website and Domain
Buy good domains and resell for a profit. Build a website or a blog, work on it for a while and get it going. Its Just like flipping houses, when you get the site to a good point, put it up for sale. People like websites that are ready to go, and they do pay good money for it. Hundreds of website are bought and sold every day on sites like Flippa.com

Get Paid to Take Online Surveys
One of the best ways to make money online is doing online surveys. Market research companies get paid from manufacturers and companies to gather feedback from their consumers, which they do by conducting online surveys. they then share some of that money, with those who participate in those online surveys. Although, paid survey scams have mad it harder for people to fin legitimate paid surveys sites, there are still hundreds of legitimate paid survey companies out there, willing to pay you for your opinion. Legitimate Paid Surveys

Earn Money Designing Websites
If you are good at it, why not make money doing so? There are even free softwares such as Kompozer that you can use to design and build nice looking website without any knowledge of html. Use webmaster related forums like WarriorForum and DigitalPoints to find buyers.

Make Money Designing T-Shirts and Other Customizable Items
If you are good at making up catchy phrases and cool designs, you can make a decent amount of money designing and selling T-shirts on sites like CaféPress. Get paid to design t shirts

Make Money with Digital Scrap Booking Templates
I personally don’t get this, but many People love to scrapbook, and they do pay good money for templates. Make different kinds of templates, and make it easy for people to use them.

Record Songs and Sell Online
Don’t laugh at this one! In this age of YouTube and instant super stardom, its not very far fetched to think you can become a star if you can sing. YouTube and other video sharing sites make it possible for anyone to have a chance to be discovered by record label companies.

Make Money Making MySpace Backgrounds
They are all over the internet, those ad for MySpace background! And that means only one thing, there is a market for MySpace backgrounds! Creating MySpace backgrounds isn’t that hard. But, most users don’t have the time to do it or are simply lazy. You can provide them with this service and customize their MySpace pages, and charge a fee for doing so. What place better to advertise your service, than MySpace itself?…

Get Paid For Your videos
With the huge interest in videos online, there is always room for more. Create interesting videos of yourself or whatever, and upload them to Web Sites like Revver and Break. They will share a percentage of their ad revenue with you. Plus you get something for each download as well.

Get Paid To Read Emails
As the title suggest, you get paid for reading emails. Everyday you receive paid emails in your inbox with links to different websites, whcih you have to click and view for a few seconds. Not a lot of money, but its something extra. Get paid to read emails

Make Money with Reward Programs
Another one of those “quick” ways to make money online. Reward programs or as they are known online as GPT( stands for Get Paid To…) are sites that pay their members for doing variety of things. Basically you earn money for doing thing that you already do online in some way or another such as signing up for freebies, registering with interesting sites, shopping, visiting different websites ad etc.GPT site are like middle man. They get paid from advertisers to drive leads (you) to them. They then give a percentage of what they earn from their advertisers with their members. GPT Sites

Earn Money Doing Directory Submission
In order for a website or blog to be successful and make money, it needs traffic. There are many ways to work on traffic. One way is to submit your site to website directories. But, many webmaster and blogger are busy with other aspects of running a site, so they don’t have time to do this. That’s where you can come in, and offer to submit their site to directories for a fee. Use forums like SitePoints and DigitalPoint to offer your service to webmasters.

Get Paid To Review
Set up a website or a blog, and start a review site. Website owners and bloggers will pay you to post a review of their site on your site. It helps them get the word out and helps you make money. You can also pick affiliate products and review them on your site and place your affiliate link for that product in the article. Every time someone buys that product using your link, you get a commission.

Make Money with a Niche Directory
You have seen those directory sites that have a list of specific sites in different categories. Set up one for yourself. Gather a list of site and sources related to a specific niche, and list them on your site. Sell ad space to other webmasters. You can charge a monthly fee to have their ads shown on your site. BuySellAds.com is a good place to look for potential customers.

Get Paid to Search
Search engines are big money makers. No wonder every day new search engines pup up everywhere. But since they are not as big as Google and yahoo and some other engines, they pay you to use their site to search. Basically their sharing their earnings from their advertisers with you. Get paid to search

Make Extra Money Making Photo Mosaics
If you can make photo mosaics, set up a website and offer your Photo Mosaics service. You will be surprised how many people pay for these things.

Work as a Virtual Assistant
Its becoming very popular, as more and more online based businesses are born every day. People use virtual assistant for research, finding things, doing time consuming tasks, making phone calls and etc. Setup a free blog or site to offer your service.

Make Money Hosting Online Forums
Use softwares like SebFlipper to host hundreds of separate forums from a single web server. Make money by charging people to host a forum with you, or offer it for free, but show your ads on their forums and make money that way.

Get Paid To Install Applications
Most People have problem with installing different kinds of applications. If you are good at installing a particular app or a software, why not make some money while helping others?

Get Paid To Answer Questions
If you have knowledge about something (which you do, everybody knows about something that others may not know), put it to work for you. There are many websites that you can offer your expertise and knowledge in exchange for money. 11 Site To Give Advice & Answers For Money.  Get paid to answer questions

Pod Casting
Think of it as a voice or video blogging. Talk about interesting topic and make money from ads shown. If you are a good speaker, provide useful information and have a nice voice, its not that hard to get hundreds of subscribers. You can use free sites like Odiogo.com to turn your blog into a podcast!

Make Money on eBay
Believe it or not, there are lots of people who don’t know how to sell on ebay. You can sell their stuff on ebay in exchange for a commission. You can take this one step farther and turn it into a bigger business by buying wholesale items and selling them individually on ebay. Don’t forget that garage sales are often good places to find worthy items for a fraction of the cost. ebay for beginners

Ways to Make Money Online- ebay
Make Money with Focus Groups
Focus group are basically the same as paid surveys, but unlike paid surveys, most focus groups are conducted in a physical location. Focus group studies are held in most major cities. You will be in with a group of other selected people, talking and answering question about whatever product or service the study is about. You can expect to get paid from $60 to $250 for an hour to a full day of study. Paid Focus Groups

Domain Drop Shipping
Its basically selling domain registration for big domain registration sites like TuCows, which makes it easy for you to start your own private label domain registration and make money not only from the initial sale, but from renewals as well.

Create and Sell E-Books
You can make e-books about anything. If you have some knowledge about anything, whether its a recipe or a how to do this and that. Its not as hard as you think. Look at some e-books that are selling for $50-$100 or whatever, and you see what i mean (most of them are crap, but people do pay for them!). How to make an ebook for free

Make Money with Amazon Mechanical Turk
Its one of the biggest unknown ways of making money online, yet its so easy to do. You do simple tasks like differentiating pictures from text, and get paid for it. If you have enough time to invest in it, you can make good money with amazon turk. Make money with amazon mechanical turk

Get Paid to Review Softwares
WebSites like SoftwareJudge will pay you for using and reviewing any of the software available in their collection.

Make Money Blogging
Blogging is becoming increasingly popular. You can set up a blog in less than an hour. There are many free blogging platforms you can use at first. When you get comfortable, then pay for your own hosting and domain name. You can blog about anything you like, no matter how bizarre and unusual you may think it is. There is always an audience out ether. You can make money with your blog, showing ads on your blog using advertising programs like Google ad sense or selling affiliate products or even your own short reports and e-books. However, making money with blogs takes lots of work and time. You have to be patient and willing to put a lot of time and effort into it.

Earn Money Moderating a Forum
Forums are another great way to make some extra money. You probably already participate in a forum or two. Why not start a forum of your own? Pick a topic you like and build a forum based on it where people can talk about it and share their ideas and experiences about he subject with each other. You can make money showing ads. And if the forum becomes popular, you can charge people to join, or have a special room in the forum where one has to subscribe in order to participate. An example of that would be the WarRoom which only paid users of worrier forum have access to.

Get Paid For Data Entry
Not the scam one, we are talking about data entry for Google. Google pays people to take photos of businesses, and enter basic data such as hours of operation. You know how many business are located just next to your favorite grocery store? MyDataTeam

Make Money Creating Softwares
Know how to make a software? Then start writing software and plug-ins. One of the hottest plug-in markets is the blogging platforms like word press and blogger. Use forums to find out what bloggers need that you can make a plug-in for. Create your plug-in or software, and set up a free blog to advertise it.

Make Money Posting On Forums
People who start a new forums often pay people to post on their forums, so it will look active, therefore attracts more people to join the discussion. Many forums will pay up to $0.25 per post, which can be just a sentence or two. Again you can use established forums to find people who are looking for forum posters.

Ads On Forums
If you like participating in forums or are already a member of any forum, look for “ad share” sign in your user CP. Some forums offer a percentage of their earnings from ads, with their members.

Earn Money Online Translating Document
If you speak a second language, why not translate document online and offline, and get paid for it? Free classified sites are the best way to advertiser your service.

Make Money on Fiverr
Fiverr.com is a site where you can make money doing almost anything you can imagine for $5. Simply register for free and create gigs, offering people your services. Whether its singing a song for them, calling their kid and pretending to be Santa or teaching them a Spanish phrase or showing them how to make a facebook fan page, people are willing to pay you doing these things on Fiverr. You will be amazed at how easy it is to make money on Fiverr with things that you could never imagine someone paying you for it.

Get Paid to Play Games (game money)
On game sites like Farm Gold and Second Life, you can make virtual money, which can be exchanged for real money. I am sure you have heard of like Ansche Chung, which is the first person who become a millionaire, exchanging her virtual money earned from Second Life for real money, worth over a million dollar. Get paid to play games

Get Paid as a Game Tester
Very easy way to make money by doing something enjoyable. But, its hard to find legit sites that pay you to test games. If you look around hard enough, you may find a company or two. If I do find one, I will update this page and post it here. So be sure to bookmark this page and check back.

Make Money with Your Own Search Engine
Use Google to build your own custom search engine. Build a search engine for a specific topic like a search engine just for finding information related to music or what have you. To get it going, set up contests for searchers, and give a prize to the biggest searcher. You make your money when people search from your search engine and click on ads.

Make Money Freelance Writing Online
One of the most popular ways to make money online is freelance writing. You don’t need any money to invest, there is no need to own a website, (although having one helps) and best of all, you can make quick money. In most cases you get paid the same day you finish working on the project. There are tons of places online you can offer your writings. There are even some websites that pay you for writing exclusive content for them. Get paid to write

Get Paid to Comment on Blogs
In order to rank higher and attract more traffic to make money, bloggers need quality links pointing back to their blog from other blogs, more than anything else. You can do that for them by commenting on other peoples blog and charging $0.50 or so for each link back.

Become a Job Referrer
Some firms pay referral bonuses of up to $1,000 for referring the right person for a job. Develop relationships with recruiters, like temporary job finding services and refer people who you know are fit for the specific job. You can do this both online and offline.

Software Plus
Work on already developed softwares and make them better and easier to work with.

Convert Online Money
You can make money by converting, EGold money into Paypal money, etc. People charge up to 5%-10% to do the same thing.

Drop Shipping
Use sites like CaféPress to create a free storefront online and be a drop shipper. You don’t have to deal with anything but getting customer to visit your online store front.

Sell Craft and Art Work Online
Have free time on your hand and are good at making things? Well, use your skills to create art work and crafts to sell online. You can sell your art work and crafts either on ebay or classified sites, especially CraigsList.

Make Money with CPA
CPA is a much easier version of affiliate marketing, which most of the time you don’t have to sell anything. You just have to send leads to advertisers site. For example, some Advertiser will pay you up to $5, each time you send a lead to there page where the person enters an email address or a zip code in order to participate in a survey to win something. Although to get accepted by CPA networks you have to have a website or a blog, you don’t need a website or blog to make money as a CPA affiliate. CPA for beginners

Get paid to Socialize
Now that Social networking sites are becoming more popular, a lot of people want to get in the game and make money running their own social networking site. But, since they need some members to get the word out and make the site look active, they are willing to pay people to become members and post messages. Here are some social networking site you can get paid . Get paid for social networking 5 Social Networking Sites that pay you

There you have it, 53 online jobs you can use to earn money working from home. I hope this list can give you some ideas and inspirations for making money online. Please keep in mind that most of the above online money making ideas, are simply ways to make extra cash. They are not to be looked at as long term work at home business plans. Although, a few of them, like making money on ebay and making money with affiliate programs do provide fantastic work at home opportunities and are revered by many internet marketers as some of the best ways to make money online.