Saturday, November 27, 2010

Features which needs to be known in Windows 7


1. XP Mode
Do you remember Windows 95 and the restart into DOS mode? Windows 7 has a feature for those XP applicationsthat do not work while running under Windows 7, and no reboot is necessary. It is an add-in to the operatingsystem download Windows 7 XP Mode, known as XPM, free from the Microsoft. You will be able to run XPapplications in an emulated XP virtualization environment. The download consists of a fully licensed version ofWindows XP with SP3 Virtual PC environment from Microsoft. Your system will need to be running a CPU thatsupports processor-based virtualization and have installed Windows 7 Pro, Enterprise, or Ultimate edition. XPMode only works with systems that have hardware virtualization (AMD-V or Intel VT) built-in and turned on.Unlike Virtual PC, though, it’s not a standalone virtualization program. Once installed, XP Mode works behindthe scenes and allows programs to runseamlessly alongside native Windows 7 applications. Microsoft claimsnearly 100% compatibility with current Windows XP applications in XPM. To help determine if your computer iscapable of running this kind of environment you can download the Microsoft Hardware-Assisted VirtualizationDetection Tool, known as HAV, to check if the computer processor supports Hardware Virtualization and if this setting is enabled in the Bios. Certain other hardware specifications might need to be in place; but no problem, the HAV will determine what is needed.


2. Windows 7 Compatibility Mode

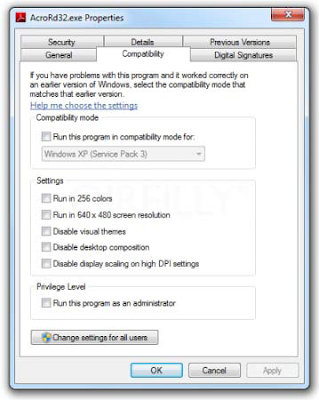
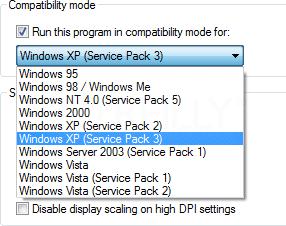
Not to be confused with XPM above, you can try this built in “fix” if you have trouble running applications designed for the previous versions of Windows. Using the CompatibilityMode, you can configure an application to tryto run in the version of Windows that it was written for. Check the option, and you will be able to select the versions of Windows to use to run the application.To configure an application to run in Compatibility Mode, right-click the application’s shortcut,.exe, or installation program, and select Properties. Next, select the Compatibility tab, and you should see the option “Run this program in compatibility mode for.” (See the exhibit below). Note that if Compatibility Mode is not supported for the application, the option will appear grayed out. The most likely reasons for this are that the application is designed for Windows 7 only, or that it is a 64-bit application.


3. Create and Mount VHD Files

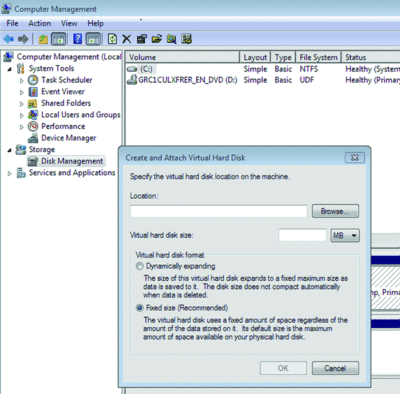
Microsoft’s Virtual PC creates its virtual machine hard drives in VHD files, and Windows 7 can now mount these directly so you can access them in the host system. Click Start, type diskmgmt.msc, and press Enter; then click Action, Attach VHD, and choose the file you’d like to mount. It will then appear as a virtual drive in Explorer and can be accessed, copied, or written just like any other drive. Click Action, Create VHD, and you can now create a new virtual drive of your own; right-click it, select Initialize Disk; and after it’s set up, right-click the unallocated space and select New Simple Volume. You will have a virtual drive that behaves just like any other, where you can drag and drop files, install programs, test partitioning software, or do whatever you like. But it’s actually just this VHD file on your real hard drive that you can easily back up or share with others. Right-click the disk and select Detach VHD to remove it. The command line DISKPART utility has also been upgraded with tools to detach a VHD file, and an EXPAND command to increase a virtual disk’s maximum size. Take a look at the new Windows 7 VHD options below.


4. Jump to the JumpLists

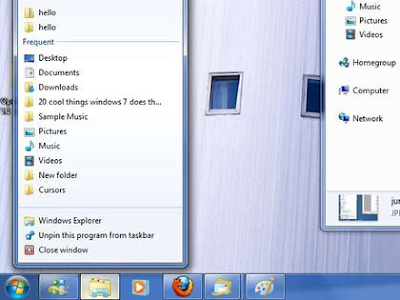
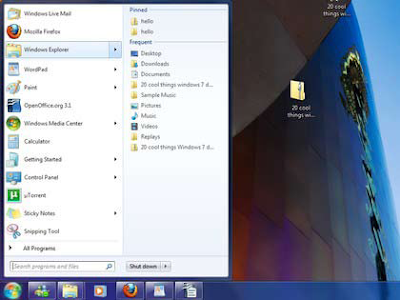
Jumplists are a feature of the re-designed taskbar that now becomes the quick-launch area throughout the entire bar. Just drag your shortcut or application icon onto it. Jumplists give you the option to view a list of recently accessed files by application, even when the application isn’t open, by right-clicking on the application’s icon in the taskbar. It also allows you to quickly access a favorite playlist without opening your media player. Jumplists can also be found integrated into the Start Menu. The following exhibits show you the Jumplist for the Explorer icon and the Jumplist for the StartMenu. I have Word pinned to my Taskbar, and from a right-click of the icon, I select the recent document from Jumplist and Word opens with my document. It save mouse clicks.


5. Preview Running Apps

Hover over an icon button on the re-designed task bar, and you will get a preview view of an open window that pops up to show you what’s inside. You can move your mouse on top of the preview window to look at a full-size “peek,” which is a maximized temporary view of your opened window. Click on the window to keep it maximized. While in Peek View, you can close the peek window with the exit button on the top right of the window. You can also use the Win + T hotkey to scroll through the preview in the taskbar.


6. AeroPeek the Desktop

In case you have not noticed the Show Desktop Button has been moved to the far right side of the TaskBar, on the right side of the notification area. Put your mouse on this new button, and it will preview the desktop. Hold down the Windows Key + SpaceBar, and you can AeroPeek the desktop; release the hotkeys, and the windows return to their position previous positions.

7. Snap and Shake into Place

Known as AeroSnap, simply drag your window to the left or right edge of the desktop to snap and resize the window to one half of the screen. Drag the window to the top to maximize it. A pretty neat idea made neater by the use of the keyboard shortcuts Win + respective left/right arrow keys). No longer do you have to frustratingly position the mouse at the edge of the window to resize it. Use the Aero Shake feature to minimize all background windows except your working window to the task bar, using your mouse. Grab the title bar of the window you wish to keep open and give it a shake. Have you ever had many, let’s say 10 or more, application and or tool windows open at the same time, and you wanted to minimize all of them except the window you were working on at the moment? Shake the window again and watch the background windows maximize. Wow!

8. Switch Multiple Display Devices

Try Win + P. Do this even if you don’t have an external monitor or projector attached at the moment. You will still be able to see the “film strip” style of duplicating or extending your display to other monitors, it takes just a second to select. The Win + P or run DisplaySwitch.exe presents you with an Alt + Tab style menu, which is ideal if you give a lot of presentations on your laptop or want to rearrange your extended desktop.

9. A Stage for Your Device

With the new Device and Printers button on the Start Menu, devices that are connected to your computer can have their own Stage. This Device Stage presents supported devices with a photo-realistic render and a link to the vendor’s website, along with other updates and useful information (such as firmware updates and manuals). Plug an external device into your machine and navigate to Device and Printers from the Start Menu. See what else your device tells you. Open an instance of the tool on your live machine and see what it will show. It will amaze you.

10. Eliminate the Notification Area
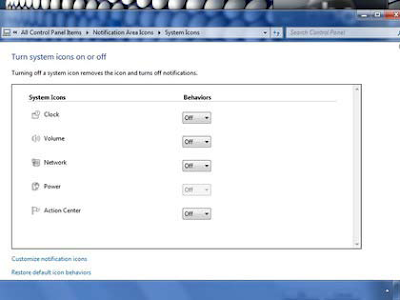
This choice is located in Control Panel under Notification Area Icons, or type Notification in the search line. What, I can even get rid of the clock and volume icons? Yes. Click the arrow that gives access to the overflow icons in the notification area and click customize. Select each icon and click hide icon and notifications to remove it. Clean up notifications by turning them all to off. With Windows 7, we finally see system tray icons behave in a similar way to everything else on the taskbar. So if you want to rearrange them, just drag and drop them into the order you like. You can


10 Cool things you can do with a USB flash drive


1: Run portable applications

In addition to storing your data, you can run portable applications from a USB flash drive. For example, OpenOffice, which is a complete office suite that includes a word processor, spreadsheet, presentation tool, drawing package, and database, is available as a portable application. Mozilla Firefox and Thunderbird are also available as portable applications. When you combine the office suite with the ability to surf the Web and check email, you’ll be able to take your most vital computing applications with you wherever you go — right in yourpocket.If that’s not enough, you can choose other applications to install on your USB flash drive from PortableApps.com(Figure A). You can even install an entire prepackaged suite of applications that includes such things as an audio player, games, an antivirus utility, and a handy menu system.

Figure A

The PortableApps.com suite comes with a menu system to allow you to easily access your portable applications.

2: Boot an operating system

If you want to do more than just run your own applications, you might want to consider booting an entire operating system from your USB flash drive. You can boot either Windows or Linux from a USB flash drive; however, the process is not an exact science and you may be in for a technical adventure.

3: Connect to a wireless network

If you have a wireless network, you can use the Wireless Network Setup Wizard in Windows XP or the Windows Connect Now (WCN) feature built into Vista to save wireless network configuration information to a USB flash drive. You can then use your drive to quickly and easily connect another computer or a WCN-compatible device, such as a router or printer, to your wireless network. To learn more about using the Wireless Network Setup Wizard, see the Help And Support Center, which isaccessible from Windows XP’s Start menu. To learn more about using the Windows Connect Now feature, see Windows Help And Support, which is accessible from Windows Vista’s Start menu.

4: Create a password reset disk

A password reset disk can really come in handy if you forget the password to your user account on a Windows system that is not a part of a domain. If you find yourself in that situation, you can use the password reset disk to reset your password and quickly get back into your user account. In Windows Vista, you can use USB flash drive rather than a floppy disk as a password reset disk (Figure B).

Figure B

You can use your USB flash drive as a password reset disk.

5: Boost performance

If you’re running Windows Vista, you can use a USB flash drive to speed up your system with the ReadyBoost technology. ReadyBoost can use the storage space on a USB Flash drive as an additional memory cache to aid the memory cache on your hard disk. And because flash memory is more responsive than a hard disk, with its physical moving parts, the memory cache provided by ReadyBoost can significantly improve system responsiveness.Using ReadyBoost is easy. You just insert your USB flash drive into your Vista system and follow the onscreen prompts to configure and use ReadyBoost

6: Manage it

If all you really want to do with your USB flash drive is transport data, and you’re running Windows XP, you can do so more efficiently with the Microsoft USB Flash Drive Manager (Figure C). Once you have installed this manager, you can easily copy files to and from your drive, back up and restore the entire flash drive to and from your hard disk, change the drive label, and even create an autorun.inf file to launch Drive Manager automatically when you plug in the drive..

Figure C

The Microsoft USB Flash Drive Manager provides you with a host of features, such as drive backup.

7: Use it as an MP3 player

Would you like to be listening to music when you’re using a computer at theoffice, but you don’t have an MP3 player? If so, you can use a USB flash drive as an MP3 player along with Windows Media Player and a set of headphones. Just copy your MP3 files to your USB flash drive, plug it into your computer, and direct Windows Media Player to build a library of the songs on your drive. You can use all of Windows Media Player’s playback features, such as playlists and favorites, to easily customize your music listening experience. And best of all, you won’t have to worry about running low on battery power.

8: Password-protect it

If you use a USB flash drive to transport sensitive data that you would prefer to protect from prying eyes, should you lose the drive, Rohos Mini Drive (Figure D) can safeguard that data. This security tool allows you to create a secret partition on the drive and then password-protect/encrypt that partition, thus protecting any documents you copy to that partition via the utility’s file manager.

Figure D

Using Rohos Mini Drive, you can secure sensitive files on your USB flash drive.

9: Run a Web site from it

If you are a Web developer, you may be interested to know that with Server2Go, you can easily run a Web server that supports Apache, PHP, MySQL, and Perl right from a USB flash drive. You can use Server2Go right out of the box without any installation. It runs on all versions of Windows, supports most common browsers, and is completely free. To a developer, the benefits of having a portable Web server on a USB drive are numerous. For example, imagine being able to carry a live Web site demo into a sales pitch meeting

10: Lock your PC

Have you ever seen a movie in which a person in some secret government installation simply inserts and removes a card to log in and log out of a PC? If you thought that idea was cool, you’ll definitely want to investigate Predator (Figure E). Once installed and configured, this little freeware utility will allow you to turn a USB flash drive into a key you can use to lock and unlock your computer.

Figure E

With Predator, you can use a USB flash drive as a key to lock and unlock your computer.

While the USB flash drive is connected to your computer, everything works as it normally would. Once you remove the USB flash drive, your computer is locked down — the keyboard and mouse are disabled and the screen darkens. To unlock your computer, you just plug in the USB flash drive and the computer will be unlocked and you can begin using it

Friday, November 26, 2010

Common PC Errors


Fatal exception error
Fatal exception errors are codes that are returned by a program in the following cases:
• Access to an illegal instruction has been encountered
• Invalid data or code has been accessed
• The privilege level of an operation is invalid
When any of these cases occurs, the processor returns an exception to the operating system, which in turn is handled as a fatal exception error. In many cases the exception is non-recoverable and the system must either be restarted or shut down, depending upon the severity of the error.

Illegal operation error
An application has experienced instability due to some type of error. This could also be caused by some other application interacting with the error producing program.

Registry/configuration error Choose Command prompt only and run scan reg.
To restore the registry Windows 98:
1. Click Start and then click Shut Down.
2. Click Restart in MS-DOS mode, and then click Yes.
3. At the Ms-Dos prompt type scanreg/restore

Not enough memory to render page
This error appears when a document you sent to the printer is too big for the printer’s buffer memory.

Data Error Reading/Writing Drive C (or other drive)
The error messages given indicate hard drive failure or serious data corruption
This error can be caused by:
Hard drive not setup properly in CMOS.
Hard drive not connected.
Bad hard drive.

This program has performed an illegal operation and will be shut down. If the problem persists, contact the program vendor
Some type of software tried to communicate with the computer’s CPU, which didn’t understand the request or the request was an invalid action.

There is not enough free memory to run this program. Quit one or more programs, and then try again
You do not have enough memory (RAM) to run all the programs you want to open

There was an internal error, and one of the windows you were using will be closed. It is recommended that you save your work, close all programs, and then restart your computer
You most often see this when you open several windows from the same application, such as many open browser windows or several text documents running in separate windows. When one of the open windows experiences errors and crashes, this message pops up

Invalid system disk Replace the disk, and then press any key
That message means that your hard drive is no longer bootable. Likely causes are a defective drive, corrupted files, or a virus.

Not enough memory to render page
The printer driver may have determined the amount of printer memory incorrectly. This behavior can also occur if the printer does not have enough memory to render the page.

Stop 0x0000000A or IRQL_NOT_LESS_OR_EQUAL
This behavior can occur if there is incompatible hardware or an incompatible device driver on your computer. Try and restore your configuration using the Last Known Good Configuration option from Safe Mode. Remove any newly installed hardware.

Invalid Page Fault
An unexpected event has occurred in Windows.
A program has requested data that is not currently in virtual memory, and Windows attempts to retrieve the data from a storage device and load it into RAM.
An invalid page fault error message can occur when Windows cannot locate the data.
The virtual memory system has become unstable because of a shortage of RAM or hard drive space.
A program is attempting to access data that is being modified by another program that is running.

Windows Protection Error
This behavior can occur when a when your computer loads or unloads a virtual device driver (VxD)

Non-system disk or disk error. Replace and press any key when ready
You may see this message if your start device/disk (floppy disk drive, hard disk drive, or CD-ROM drive) does not contain boot files

Fatal error: An error has been encountered that prevents setup from continuing.
One of the components that Windows needs to continue setup could not be installed.

You may see this message if your hard disk is damaged or corrupted. You receive the error messages because the Setup program is trying to repair the problem on your hard disk.

System has recovered from a serious error
This problem occurs because after a Minidump file is written, the paging file continues to have a flag set that indicates that a Minidump file must be written.

The system is low on virtual memory. Windows is increasing the size of your virtual memory paging file
This issue may occur if there is not sufficient memory on the computer, and when the current virtual memory settings are not set high enough.

This application requires the Windows Installer to run
The Windows Installer is missing or damaged.

Internet Explorer. A runtime error has occurred. Do you wish to debug
Internet Explorer is displaying this message because it has encountered this error when trying to run some JavaScript on the page.
This message may appear when the Visual InterDev PageNavbar control tries to open a Web page whose name contains an apostrophe (').

The margins of section X are set outside the printable area of the page. Do you want to continue?
Your margins are set closer to the edge of the paper than your printer is capable of printing.

Blue Screen Error


A stop error screen or bug check screen, commonly called a blue screen of death (also known as a BSoD, bluescreen, or "blue screen of doom"), is caused by a fatal system error and is the error screen displayed by the Microsoft Windows family of operating systems upon encountering a critical error, of a non-recoverable nature, that causes the system to "crash." The common expression blue screen of death comes from the color of the screen generated by the error.

Stop errors are usually hardware or driver related,[1] causing the computer to stop responding, whereupon, in the latest versions of Windows, the screen presents information for diagnostic purposes that was collected as the operating system performed a bug check.

If configured to do so, the computer will save all of its memory data to a disk file (known as a "dump file") for later retrieval, to assist in the analysis by an expert technician of the causes of the error.

Solution:

1) You can shutdown your computer and remove your ram and then again insert it. Moreover it will get solved by doing this.

2) You can increase your virtual memory by increasing your paging size.